Christian Dior’s designs have long been the quintessence of couture. The complicated pattern work, sharp tailoring, exquisite dressmaking, and engineering continue to set the bar for other designers. Maria Grazia Chiuri, the creative director of the house today, has beautifully carried on couture techniques of the past. A sewing contemporary of mine, Marie Um Zuzu (Instagram: @couture_au_coure), documented the making of a Dior skirt designed by Chiuri, and the details of it intrigued me. I attempted to replicate the same skirt, which is from the Fall 2021 Haute Couture collection. It is a high-waisted, wool, gored skirt held up by an inner waist corselet and stay. You will understand shortly why this skirt is couture and not in the ready-to-wear collection.

Pattern
Marie suggested a Vogue pattern that closely resembles the skirt as a starting point for creating the muslin/toile for this skirt. The pattern is a dress she cut off below the bust to make a skirt. The skirt has 20 gores or panels. I added additional seam allowance to the pattern pieces as the standard ⅝ is never enough. Seam allowances are generous in couture to allow for proper fitting and finishing. I added ⅜ inch to each vertical seam line to make my seam allowance 1 inch.

Fit
I broke the first cardinal rule of couture and did not make a muslin. I thought I could measure the waist circumference of the pattern pieces and make adjustments to the pattern. One challenge with a gored skirt is that you want all the gores to be even widths around. If you are going to attempt this skirt, you should at least make a toile of the top half of the skirt to just below the hip. This will save fabric and help you dial in the waist and abdomen fit, which is so important. I did not make a muslin and had to make a 4-inch (10 cm) circumference adjustment after I had already sewn my skirt together, which is not ideal. Dior would have done a toile fitting. In fact, the cotton mock-up would have been just as beautiful and perfect as the finished garment. However, it was easy enough to make the adjustment, as I had plenty of seams to spread it across. I took in 1 cm at every other seam, or 10 seams in all.
Fabric for the Skirt
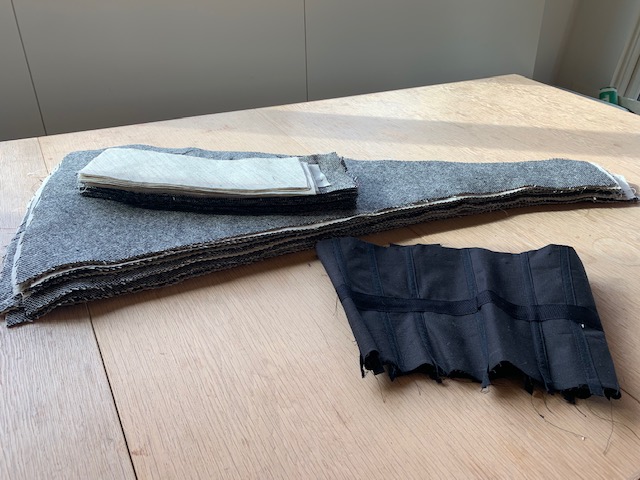
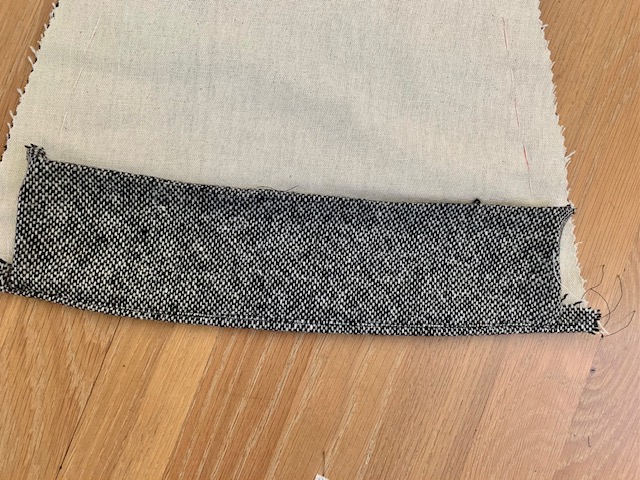
I selected a 100% wool salt and pepper tweed from Ireland, which I purchased from Britex Fabrics. It is a lovely heavy-weight fabric that still has excellent movement and drape. It closely resembles the Dior skirt. The pattern required approximately 5 yards of 60” width fabric without a nap (more would be required if you have a nap or directional motif).
Another cardinal rule of couture is to underline the fashion fabric. I used cotton muslin fabric that was cut and sewn as one with the wool. Underlining supports the fashion fabric and is necessary in a garment like this. Christian Dior often used cotton muslin, or calico as it is sometimes called, as underlining for his designs. Alexander Palmer’s book, Christian Dior: History and Modernity 1947-1957 (Royal Ontario Museum, 2018)* shares some great descriptions and pictures of the inner workings of his original designs. Dior’s motto is that a garment should be as beautiful on the inside as on the outside. He did not try to hide the craftsmanship and engineering of his garments with lining, which is common in ready-to-wear garments. He left it exposed and neatly finished by hand on the inside. Underlining allowed him to celebrate the refined skills of the les petite mains while maintaining the beauty of the garment on the outside.

Fabric for the Corselet
I used a cotton coutil to make the corselet. To make a waist corselet, you can take a corset pattern and cut off the bust area. See Susan Khalje’s article, Hidden Support on making an inner corselet (Threads Magazine #145, Nov. 2009). If you want more detailed corset engineering, Alison Smith’s video on Craftsy is excellent. The difference between a corselet and a corset is that a corset is a stand-alone garment. A corselet gets sewn to the garment and supports the garment. Without inner support at the waist for this skirt, it would just collapse and slip down with the weight of the fabric. The principle for the corselet also applies to a strapless dress. The only thing that can properly hold up a strapless gown is an inner corselet with a waist stay. Without it, you will tug and try to pull it up all night. A corselet anchors to your waist, and the garment hangs from the corselet, so there is no slippage.
Laying out and Cutting the fabric
In couture, the fabric is generally laid out in a single layer with whole pattern pieces. One should never cut on the fold because you cannot maintain the integrity of the grainline. The fold line of fabric is never an accurate determination of grain. If you only have half a pattern, then you make a whole pattern piece. If you only have a left piece and need a right, then you make the right pattern piece. I also broke this cardinal rule, and paid the price. In this pattern, there were 10 pattern pieces for the 20-gore skirt. The Vogue pattern tells you to cut the garment on the fold to get the mirror image of the other 10 pieces when you cut. If you are cutting on a single layer of fabric, you have to flip the 10 pattern pieces over when ready to cut the remaining pieces. I forgot to do this. Luckily, the ten pieces were evenly shaped and fairly symmetrical on both sides, and I had extra fabric.

It is acceptable to layer two pieces of fabric with selvage edges aligned and cut as one. I laid my cotton muslin on top of the wool (wrong side to wrong side), carefully making sure the selvages were matched. I then laid all the pattern pieces on top of these two layers and carefully pinned the pattern to the layers. I used a ruler to ensure the pattern’s directional line was perfectly parallel to the selvage edges.
I cut out the pieces using a rotary cutter, although scissors would have been fine too. I removed the pattern and then marked the seamline on the muslin, with an erasable pen (Frixion). I then thread-traced all the seamlines, joining the muslin underlining and wool fabric together. The thread-traced seamline serves two purposes. It holds the layers together and is a guide for machine sewing the pieces together on the seamline. The seamline should always be your guide for stitching a couture garment, not the cut edge.
Additional preparation
Unlike regular garment sewing, you must finish the hem of each gore separately before sewing it to the next panel. Usually, you sew all the side/vertical seams of a garment together, and then turn up the hem as one. Because the gores have a curved shape at the edge and my fabric was very thick with the addition of the cotton, I decided to face the edges of the skirt instead of just turning it up and finishing. This method created a challenge, which I will explain later. But, you will need to cut separate facings (20 in all) in the same fabric (wool), which I did, or in another less thick fabric. My facings were 3.5 inches wide and matched the same shape as the bottom of each panel.

Sewing the garment
I faced the hem with the same fabric, and then starting from the bottom of the hem (and going to the waist), I sewed the panel seams together, keeping the seam allowances of the hem facing clear. I wanted to finish each hem facing and turn up the hem and sew by hand. However, as soon as I did this, the cones flattened and flared, which is different from the look I wanted. I wanted perfect cone shapes like the original garment, not a flared gored skirt. I learned that creating this look all depended on how I treated the seam allowances on the inside of the garment and how I finished the hem.


The seam allowances of the hem facing have to be either sewn as one with the seams of each panel or turned under just abutting the seam line of the panels, which is what I did.
I might have used a less thick fabric to face the hem and could have done the former.
Why do I have to do this? Because the “standing seam” of each panel cannot be interrupted. Otherwise, you get the flat and flare look, not the cone look.
The process is this. 1) sew the hem facing to each panel edge, press, understitch, and finish the hem 2) baste the panels together and then machine stitch starting from the hem and going to the waist, including the seam allowances of the hem facing (if fabric is not too thick) 3) Sandwich press the seams on both sides after sewing (press in the same direction as sewn – bottom to top). Do not press open the seam. 4) Just below the waist (3-4 inches), snip the seam allowances at an angle. Trim the seam allowances above this as needed, and press only this section open. A clapper, by the way, is an excellent tool for pressing seams open, especially on wool. Leave the remaining seam allowances below this snip together. Again, do not press this standing seam open.
I found it easier to sew, press and finish the front of the skirt (10 panels) and then sew, press and finish the back of the skirt (10 panels), separately. Once you put the front and back together, it is more cumbersome.


Seam Finishes
I hand-overcast the seam allowance edges of the standing seams. Alternatively, you could do a bias-bound finish on the standing seam. For the abdomen part of the skirt, I trimmed and pressed open the seams and catch-stitched it by hand to the underlining so that the seams would lie flat. The hem facing was slip stitched in place, just abutting the standing seam and not enclosing it. I did trim the standing seam at a slight angle at the edge of the hem before enclosing it with the overcast stitch.
I did not use any hair canvas or horsehair braid for any extra support in this skirt because the fabric and underlining were heavy enough to perform their job. However, my friend Marie did utilize these for additional support as her fabric was a lighter wool.
Zipper
I basted the zipper in place and then hand-picked it. An invisible zipper is a big no-no in couture. A hand-sewn zipper is elegant, and honestly, there is no way an invisible zipper could have handled the weight of this skirt. It weighs almost 5 pounds.
Making and attaching the corselet
The corselet is easier to make than it sounds, but it does require some help to get it to fit properly. Luckily, I had one already made from a previous garment, and I have a good friend who helped me dial in the center back for the hook and eye placement. I used steel boning for the corselet, which you can purchase from Susan Khalje couture.

You then need to add the essential piece of the whole garment – the grosgrain ribbon waist stay. Try on the corselet. Wrap the ribbon around your natural waistline, pin it tightly, and determine and mark the proper placement. Sew the ribbon to the corselet, avoiding the boning channels.

Once the corselet is complete (except for the hem), you can attach it to the skirt. Make sure boning is out of the way before sewing the edge. If you are concerned with the corselet showing at the top edge, you can add a bias facing that matches your garment fabric. I did not because my fabric was so thick. Understitching all the seam allowances to the corselet forced the garment fabric to roll more to the inside and prevented the corselet from showing. I also did a row of hand pickstitches at the top edge to hold the layers in place (like top-stitching but it is inconspicuous with this fabric). Put the boning back in place and carefully sew/finish the bottom edge of the corselet. I enclosed the bottom edge with purchased bias tape.


Lining
Although I did not add a skirt lining, you may want to add one to the edge of the corselet. It will be a paired-down version of the skirt and could just be an a-line or gathered shape. The purpose of lining is to provide comfort to the wearer and to hide any seams. I liked the skirt’s crafted look and did not feel the need to hide it. I also did not want to add more weight to this heavy skirt.

Voila! Perfect cones and a couture skirt!
You must be logged in to post a comment.